Monday, November 17, 2014

Getting a Holiday Head Start with One Thimble!

Hi there! I'm still here, in case you were worried. It's been a hectic month with Halloween and Miss P's 5th birthday in the same week, and all of the usual life-with-little-kids stuff that seems to leave little time and energy at the end of the day. And now, here come the holidays! We celebrate Chanukah in our family, and thankfully it's not super early this year so I've got a little time to plan.

Look who's freshly 5!
As I started making lists of things I wanted to sew for gifts this year, I was invited to review the latest edition of One Thimble, a sewing e-zine based in Australia. SO exciting for me! Have you read OT before? It is seriously amazing, chock full of not just patterns (and there are many printable PDFs included) but also articles and notes with tons of helpful tips and tools for home sewists. There are even some great tips for things to consider if you're selling your sewn goods. This issue (which is Vol. 5) has a great article with helpful notes for shirring and even tips that are based on WHAT TYPE OF MACHINE YOU HAVE. None of that generic "give this a try and it's so easy!" stuff here, which I really appreciated since I've been a consistent failure in the shirring department. I'm feeling pretty motivated to give it a try again now, armed with some of these tools.

I also really loved Serger Pepper's comprehensive guide to cleaning and oiling your serger. It was clear and concise yet very detailed - I liked how easy to follow and well-illustrated the article was, too. I'm not one who's known for keeping a nice clean sewing area (ahem) but I do at least dust off my serger with some frequency. The other steps that Irene outlined for cleaning and oiling my machine definitely look manageable, and as soon as my machine oil arrives in the mail (yep, just ordered it after reading this) I will be spending some more time on this for sure. 

And the patterns? Oh my goodness there are so many - and so many that I knew right away that I would use - that I didn't know where to start. I had Miss P take a look at the pics with me and see if there was anything that caught her eye. Not surprisingly, she went right for the Art Caddy. 

Superhero girls + craft supplies = fun combo.
The pattern has a cutting chart with all of the dimensions for the outer and inner fabrics as well as the pockets, binding strip (which you'll see on the inside), and the straps. I ended up deciding to use twill tape for my straps because a) I really loathe making straps in general and b) I have tons of twill tape on hand and not enough uses for it. I used resin KAM snaps (size 20) for the closures, which worked well.
Inside view, paper and crayon pockets.

Alternate inside view, pencil pockets and sticker pocket.


The final product came together easily - the most time consuming part was stitching all of the lines for the pencil and crayon pockets, but as this pattern is well organized and full of straight lines, it was a one-evening project and the pockets were loaded and ready for Miss P to wake the next morning. Her reaction did not disappoint - she was soooo excited for this! It's the perfect size (about 9" x 16" when open/laying flat) as it holds a lot of supplies but is still nice and lightweight and easy to tote around. We actually went to the library that morning for little brother's storytime, and Miss P brought the art caddy with her and set to sketching a bit while she waited for him.

There are two sets of pockets on each side of the caddy's inside, and while one layer holds the writing/drawing implements, the other is well sized to hold a small pad of paper, some stickers, or other small craft supplies like child scissors or decorative tape. The snap closures are easy for P to open and close herself, and I appreciated the extra snaps that are used at the corners, as they helped keep all of the crafty goodness tucked in tight. Clearly P has appropriated this one, but I'll be making more of these as gifts for sure - they'd make a great gift for kids of various ages, and I'll probably add a coloring book into the package when I gift them too.

Isn't that backdrop cool? It's actually the tabletop in the children's room at our local library. So yummy.
The other pattern that I chose to work with was the Miss Miranda applique. I love doing applique for the kids' shirts and things, but I don't usually do designs that are this big or intricate. And I'll confess that I nearly chickened out of the hand embroidery and machine stitched her face, but I'm glad I didn't.

A little wonky, but she's all mine. The kid and the applique. ;)
Here on the east coast of the USA, winter is fast approaching and we're not feeling terribly summery these days. Miss Miranda's adorable summery dress and pineapple embroidery are super cute, but I wanted to dress her up in something less seasonal. P asked me if I could make a ballerina for her, so we decided to give it a try.


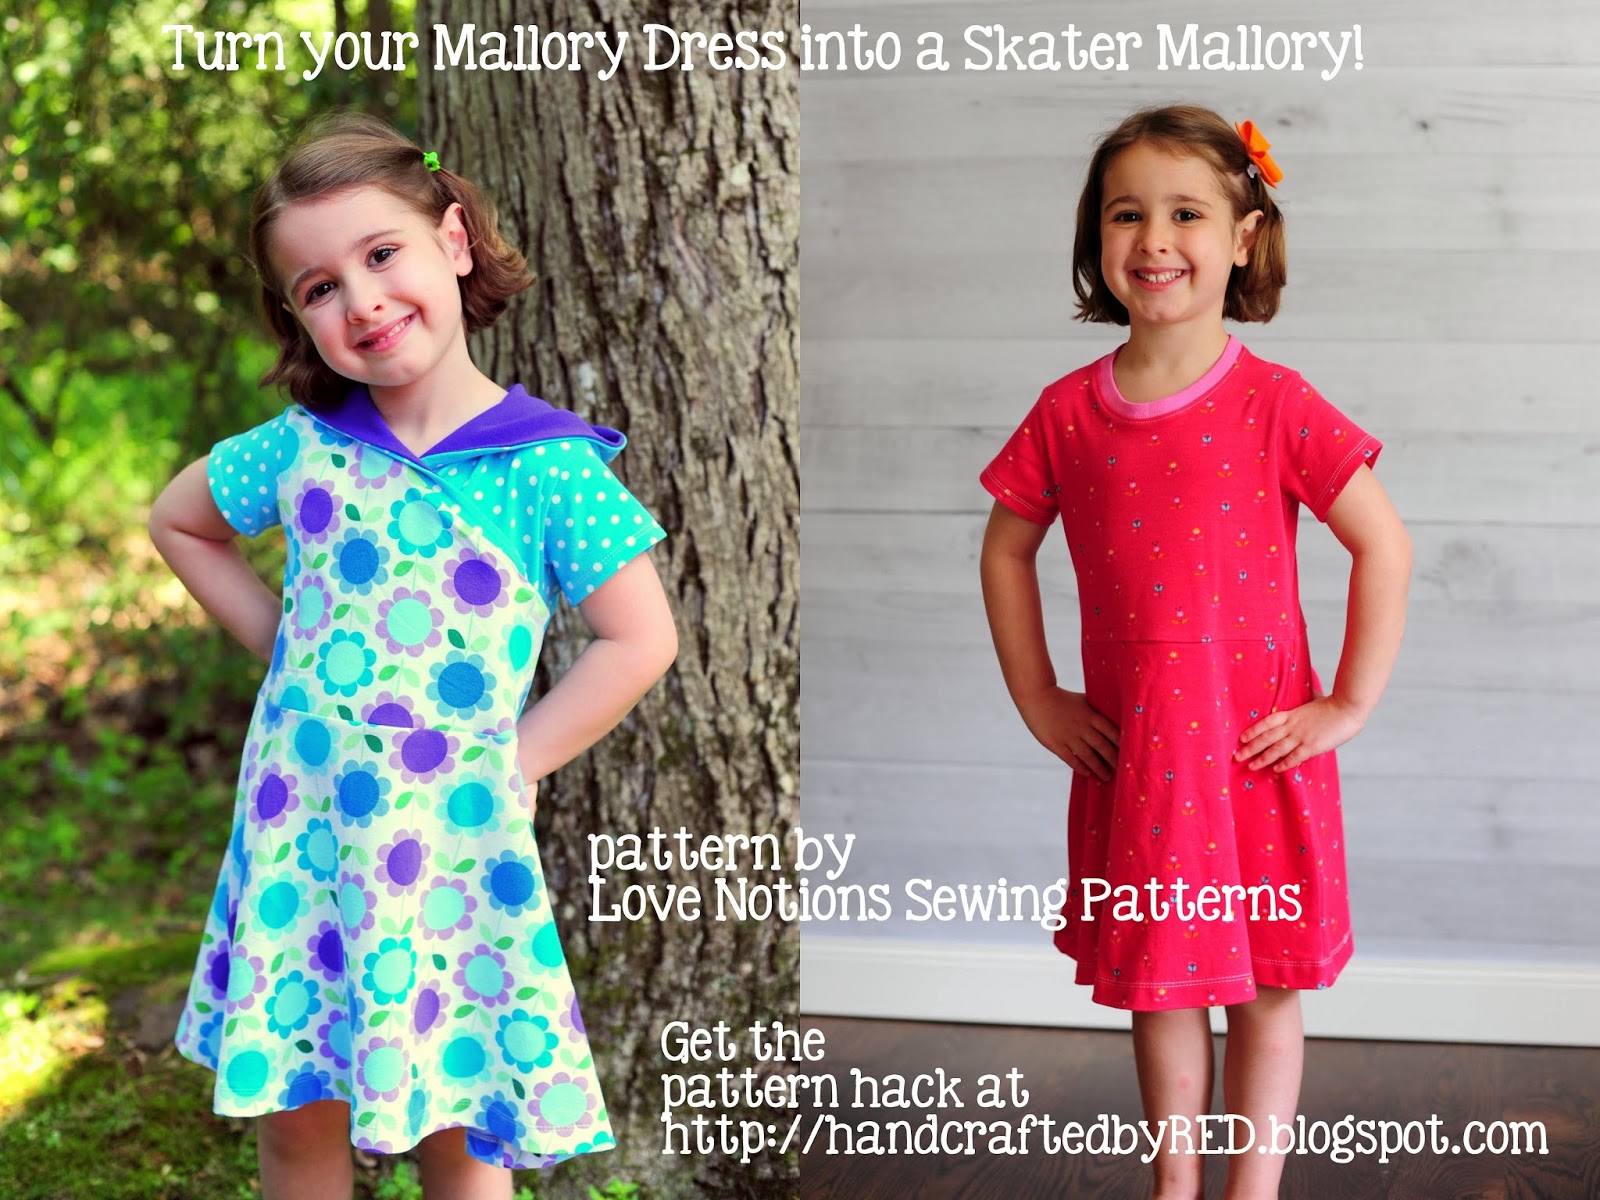
For the dress itself, I used the Mallory dress pattern from Love Notions patterns. I've blogged before about how I altered the pattern to make a skater-style dress (tutorial is here) and I decided that would work well for this applique too. I ended up lengthening the bodice about an inch and shortening the skirt a tad, as well as adding sleeve cuffs and a mini-mock turtleneck. I wanted to make this a minidress that was clearly the ballerina/skater style. And because it's all knit (cotton/lycra), it's very soft and comfy, too.


For the applique, I used all quilting cottons and topstitched them onto the bodice with a short straight stitch. The edges will fray a little in the wash, but I personally like that look so I'm ok with it. I added the pink bow per Miss P's request (that's how she wears her hair to ballet), and freehanded the little ballet slippers to layer on top of the feet. The main addition to the pattern was the little tutu, which is made from nylon chiffon (I got mine from fabric.com).

I cut a piece of chiffon that was 8" wide by 4" long, and the folded it lengthwise so the folded edge would make the "hem" of the skirtb (leaving me with a folded strip that was 8" wide by 2" long). I gathered the raw edges until it fit the waist of Miss Miranda, and used a zig-zag stitch to attach it to her dress. I stitched a small piece of ribbon on top to cover the zig-zag stitches and neaten the waistband - if you do this, make sure to heat seal the ends of the ribbon so it won't fray. I used a small piece of wash-away Wonder Tape (possibly my most favorite sewing item ever) to hold it in place while I stitched it down, and added a button for a little extra cute (and because I never know when to stop).

Nighttime phone pic, but you get the idea.
Miss P gasped when she saw it, and then shrieked a little for good measure.

And then, true story, she very sweetly asked where the rest of the face was. Oops.


I mentioned earlier that I nearly chickened out when it came to the hand embroidery, but when I summoned up the guts to set to work on it, it was super late and I just couldn't get it done. I stitched and un-stitched those eyelashes a thousand times (ok, so it was three or four times) to get them lined up just right, and I was zonked. So it took me longer to finish that cute little face (which to be fair, is actually quite simple) than to do the rest of the entire piece, P's dress included.

Totally worth the effort, and so sweet.
Miss P begged to take photos immediately so she could wear the dress to school the next day, so we grabbed the last sliver of daylight and danced around our yard for a bit. I love the look of the applique on the dress, and I think it would look so cute on a little tote bag, too.

This issue of One Thimble did not disappoint when it comes to gift ideas; I'll be making the Art Caddy and Miss Miranda applique again, but I'll also be trying out some of the other patterns in the coming weeks for sure. There are lots of exclusive coupon codes in the magazine too for some really great deals. Make sure you check out all of the other stops on the blog tour to see what the other ladies have sewn up, and enter the Rafflecopter here for your chance to win the complete issue! Thanks for joining us!


Saturday 11/15: Handmade Boy
Sunday 11/16: Mimi's MomRebekah Sews
Wednesday 11/19: Made by SaraBee Quilted Beauties


a Rafflecopter giveaway


Tuesday, September 16, 2014

New tutorial over at the Peekaboo Patterns blog!

Sorry for the extended absence - the end of the summer was a whirlwind of family fun, settling into the back to school routine (and the beginning of toddler preschool mornings for my little guy!), and lots of pattern testing. I also took a few weeks to write my newest tutorial for the Peekaboo Patterns blog, which will post tomorrow morning (Wednesday 9/17). 


For this one, I made a huge dent in A's fall wardrobe by upcycling mens' tees and long sleeve shirts. I used a variety of patterns to make a fun set of shirts for my boy - many of them feature cars or other means of transportation, but at least a few (like the farm animal one above) managed to get approval from A despite their non-vehicular nature. I've got two mini-tutorials in there - how to add a hood to a basic tee pattern, and an easy way to do some colorblocking - and lots of tips and tricks for making the most of your upcycles. Hope to see you over there!

Thursday, August 28, 2014

"Have a Ball" from LLK - how to make sure your ball isn't an egg!


So, I have a confession to make. I joined the FB group for Little Lizard King awhile back, having sewn a few of Liz's patterns, and bought the Have a Ball pattern as soon as it was released. It is such a cute idea - although my husband said (and I quote), "Now even balloons have to have handmade clothes, too, Rachel?!" But I made one, and it came out great. Not perfect, but nice and plump and ROUND. A number of people had commented on the LLK page that their products were looking a bit...egg shaped. It was disappointing, for sure. But no, my very first try was round as could be.

So I'll admit, I gloated a little and then set about making 7 more the next night. (To be fair, we were going to a party that weekend and I wanted to bring them for all of the kids who would be there, despite my husband's pleas to "just bring a bag of balloons! Or dessert!") I started inflating balloons and ended up with 5 nice round ones, 1 that was semi-egg shaped, and one that was downright eggy. Well. That deflated me a bit. (Ha.)

I looked at them a bit more closely, and examined my scraps for a bit, and I think I've figured it out. The pattern pieces have a clear orientation and an arrow depicting which way the grain of the fabric should be on the piece. Even though we're working with wovens here and not knits, the cotton still has a slight stretch to it. Generally the fabric stretches horizontally, or from selvage to selvage.

When the fabric is cut in the proper direction - with the pattern piece oriented vertically on the fabric - the fabric will stretch AROUND the balloon. When you orient the pattern piece the wrong way on the fabric, the resulting panel will stretch vertically - toward the ends of the ball. This will leave your ball looking more egg-shaped than round, like my example on the left in the picture above.

There is a clear arrow on the pattern pieces indicating which way the fabric should be oriented with regard to the grain, so make sure to follow it for a rounder product. I was working with a few small cuts and scrap pieces, and trying to squeeze as many panels out of those pieces as I could, so I turned the fabric a few times and cut however the pattern piece would fit - which is how I ended up with several pieces being cut with the wrong orientation. I didn't think much of it when cutting, to be honest, since my prints were non-directional (like the red and white polka dots in the middle example above) - but the results made it pretty clear. I've since made sure to orient the fabric and pattern pieces properly, and haven't had any eggs again - except for breakfast. ;)

P.S. My husband still thinks these balls are a little silly, but everyone we've given them to has really enjoyed them. And my own kids play with them pretty much daily - even the eggy ones, which are of course ours now too. You can find the pattern for sale here: http://littlelizardking.com/home/103-have-a-ball.html

Monday, August 25, 2014

#BundleUp - for BOYS!


I'll admit, I totally shrieked when I got the email inviting me to join the Bundle Up blog tour - I checked the email a few times to make sure it was actually my name on there and not a mistake, and then excitedly signed up. The Bundle Up sale is an awesome opportunity to purchase BRAND NEW releases at steep discounts, for 2 weeks only. Check out all of the details and the awesome patterns included here.

I got to review the Zee's Tee pattern from Tie Dye Diva and the Zander's Hoodie (and vest) pattern from Everything Your Mama Made (EYMM) for my little guy, A, who is 2. (Disclosure: these patterns were provided to me at no cost for my review. My opinions, fabrics, and time spent with the seam ripper are my own, however.)

One of the things I love about sewing for my boy is that it gives me a great opportunity to branch out from the styles and colors that I readily find in RTW (ready to wear) boys' clothing. Now that he's not a baby anymore, I definitely think a little more about mixing and matching things for him - and I am really loving playing around with color and style and trying to break away from the standard boys' fare of navy or red, athletic or preppy, play clothes or dress clothes.

Since A is just 2, I still have a lot of say in what he wears, but he's increasingly developed opinions on the subject - according to him, if a shirt has cars on it (win) and shorts have cars on them (win), they match perfectly! I want to make clothes that he'll enjoy wearing, so I do a lot with cars - car fabric, a small car applique, a patch "tag" made from car fabric - you get the idea. ;) Luckily, he likes lots of colors (unlike his dad, who according to family legend had a childhood phase during which he would only wear items that were green) and although he definitely loves comfy knits he doesn't complain about wearing jeans or other woven bottoms. He can be particular for sure (see above re: cars, cars, and cars) but isn't picky. And he LOVES when I make things just for him. (I melt.)

I started with the tee because well, it was easier. I've made a lot of tees and figured I'd work my way up to the hoodie from there.


The pattern is well written and easy to assemble, and full of options for various types of colorblocking. I used a cotton lycra euro-style knit from Sweet N Charmed fabrics for the top, and upcycled a men's Old Navy tee for the bottom of mine. I love the bold prints and fun colors on knits like these (teal and orange?! and sharks? Awesome!) but at $20+ per yard, I definitely like to make my yardage stretch as far as it can. A pattern like the Zee's Tee is perfect for something like that (and is a great use for scraps, too, since some of the various color block options use pretty small pieces). And sure, I could cut an existing t-shirt pattern into pieces and do the colorblocking myself, but sometimes it is totally worth a few dollars to buy a pattern that does it for me - saves me time that I can use for sewing, and I know they've tested it and gotten the proportions just right.

Those lips! And cheeks! I love that sometimes he still looks a bit like a baby. <3
If you've ever read a fashion magazine or watched a home decorating show, you've likely heard advice about mixing high-end and lower-end (read: less expensive) items to develop a unique style that doesn't break the bank. This is what I try to do when making clothes for my kids - they are kids, after all, who will more than likely wear the item a handful of times before they either outgrow it or have one too many encounters with chocolate/tomatoes/watermelon/mud/all of the above.


Because my little guy wears a lot of t-shirts, I like to make sure they fit him well and have something about them that is a little interesting. This tee fits great (it's a true-to-size 2T, and other than adding a little extra length next time since he has a long torso, I don't need to make any adjustments. I used the colorblock option with the front and back yokes and sleeves in the print, and the lower front and back in the stripe. The only modification I made to the pattern was to add decorative topstitching along the colorblock seam in the front and back. I used orange thread to add a little more color, and played around with decorative stitches on my sewing machine until I found one that looked like little sharks' teeth. (I have a Brother cs6000-i and it was stitch #26, in case you're curious. Chomp away.)


I love having a ready-to-go colorblocked pattern in my files, and with a nice range of sizes included (12-18m - 11/12) I know I'll be getting a lot of use out of this one in years to come.

After finishing the tee, I moved onto Zander's hoodie. I had a feeling this one would be a little bit more of a challenge with a satisfying result, and it didn't disappoint. 


Zander's hoodie (or vest, if you leave off the sleeves) is a partially lined hoodie with optional pockets and an awesome asymmetrical zipper. I used sweatshirt fleece for mine and it had very little stretch, but still sewed together nicely. (Side note: I bought yardage for this from Joanns and their sweatshirting is a poly/cotton blend with a lot of poly. Upcycled RTW sweatshirt fleece is typically a higher percentage of cotton and has a bit more stretch to it. Organic cotton sweatshirt fleece is awesome but more expensive. Not all sweatshirting is created equal.) I lined the body and the hood with the same cotton lycra that I used for A's tee above. As I mentioned earlier, I love the look of bold fabrics like these, but tend to pair them with something a little more neutral. In this case, I used the black sweatshirt fleece, black rib knit for the cuffs and waistband, and a bright teal zipper that I picked up in the Garment District in NYC a few months ago (pure luck that it was a nice match for this knit print). 


I sewed the size 2/3 for A and it was a great fit. The sleeves are a little long, but my kids have short-ish arms so that's a common issue for us. Otherwise, the fit was spot on with plenty of ease for another layer underneath. I know A will get a lot of use out of this hoodie as a light jacket in the fall. The lined bodice and generous hood made for a super cozy jacket. He actually cried when I told him we needed to take it off to take photos of the tee underneath - and it was 80 degrees when we were taking pics and running around with the soccer ball, too. 


This is definitely an intermediate level pattern, but Kymy's instructions are fantastic. I found myself reading and re-reading them, but it honestly all came together for me as I was actually sewing the pieces together. The hood pieces are connected and joined to the body in a different configuration than I've sewn before, and the pattern pieces themselves were even uniquely shaped. That lack of familiarity was actually what made the pattern challenging for me, since the steps felt a little less comfortable/intuitive than usual. I've made many hoodies before, but not with this type of construction, so it felt a little like I was constructing a hooded jacket for the first time. I really enjoyed it, aside from the time I spent around 1AM with the seam ripper (mainly trying to get the pockets lined up when installing the zipper). 

See? Pockets are (mostly) even. Good thing this boy rarely stays still.
The way the lining is attached is perfection, and the inside looks awesome, especially around the waistband. I loved the way it all came together, and was so excited that my little guy loved it too. I suspect he'll spend a lot of time zipping and unzipping the front. :) I really like that this is a basic enough wardrobe piece to be wearable for everyday, but with unique and fun details that make it stand out from all of the other hoodies in his closet.


I loved sewing these patterns for the tour, and am so grateful to have been included. Please make sure to check out the other stops on the tour (seriously, so.much.talent.) and remember that the BundleUp sale is only available through August 29.


Thanks again for stopping by - I'd love it if you follow along with Handcrafted by RED on Facebook and Bloglovin, too!

Friday, August 22, 2014

#BundleUp for boys - testing the Lumberjack Shirt

I'll be posting for the Bundle Up blog tour on Monday (I know, big deal stuff! I'm still so excited - and flattered - that I was asked to join!), and the sale is now live here. The sale will run through August 29th, and feature brand new patterns from these amazing designers:


I was actually a tester for the Lumberjack shirt pattern from Patterns for Pirates, and LOVE the finished product. I volunteered to test without actually seeing the pattern, so I had no idea what to expect. The flannel reminded me a bit of my middle school days in the early 90s, and seemed so different from my little guy's "typical" style of bright tees and jeans. Lucky for me, I had hoarded a bunch of clearance heavy brushed flannel remnants from Joann's last winter, and had plenty to work with. I chose the unlined version and used a firetruck interlock to line the hood and cuffs.  (Tip to moms and dads whose little guys only want to wear car fabric - I find if I sneak a little bit of car/truck/bus/train into his clothes somewhere, A loves having a little "secret" and is more willing/excited to wear things that normally he'd shove to the back of his drawer.) 


(And yes, my 2 year old prefers to pick out his own clothes and has strong preferences about color, style, etc. So much for all of the "little guys don't care as much about what they're wearing" that everyone told me when he was born. I blame his father. ;) )


The fit of this shirt is fantastic - it's a more relaxed fit than most oxford patterns, so don't overlook this one in the bundle just because you already have an oxford pattern in your stash! It's got a bit more ease because it's designed to be worn as a layering piece over a tee, and there's an option to line the full pattern and wear it as a nice fall jacket. You can also include the hood, like I did (I am a bit hood-obsessed), or do a collar instead. The sleeves have plackets and the cuffs are attached separately and have a button or snap closure, and there's a pocket pattern piece included as well. No shortage of options here!


Lots of testers took photos on farms, near tractors, or with other awesome backdrops in keeping with the lumberjack theme. Here in the wilds of the New York City suburbs, I don't have a supply of tractors at the ready (though A would LOVE if I did), so we went to our local Home Improvement Superstore (no brand loyalty here ;) ) and staked out the lumberyard. A loved watching the contractors hoist the lumber onto the pallets, and they got a kick out of him singing "Let It Go" as he ran up and down the aisles. 


The Bundle Up Sale runs for one week only, and none of these patterns will be available individually until September 10th. Check out the patterns, build your bundle, and make sure to stop back on Monday to check out the two awesome patterns I sewed up for the tour!


Have a great weekend!

Tuesday, August 19, 2014

Contributor Post for Peekaboo Patterns - Turn Any Bodice into a Tiered Ruffle Dress!


My first contributor post and tutorial for Peekaboo Patterns will be up tomorrow - I'm so excited!

When I posted this collage for the Rio Racerback Sew Along last month, I got a lot of great feedback and more than a few questions about how I constructed the skirt.


 I figured it would make for a fun first tutorial to write (and it did!) and filled P's closet with new dresses while I worked on various versions. Make sure to check it out tomorrow and share your thoughts - would love to see you on Facebook or follow along on Bloglovin. Thanks for stopping by!

Monday, August 18, 2014

"Hidden" Pattern alert - Love Notions Mallory Dress includes a bonus pattern, too! (tutorial inside)


It's no secret that I'm a huge fan of Tami Meyer's Love Notions Sewing Patterns. Tami is an amazing sewer, and has had a successful business for many years selling custom designed children's clothing. Recently she began grading her patterns and releasing them for sale to home sewers (seamstresses? sewists? I'm still tripped up on that one...) like me. After sewing the Everyday Playdress, I sent Tami a message and basically begged her to let me test for her. ;) I might have even included a few photos like this one, of P in one of her Everyday Playdresses.

(Shameless.)

Tami invited me to join her group of testers, and since then I've tested the Trendy Tunic, the Tuxedo Dress, the Cartwheel Collection, the Hip Hop Tank (and the Ladies Hip Hop Tank - the first sewing I've done for ME that I was actually happy with!), the Mallory dress, and the Samson Sweater - her first pattern for boys that has just been released (and is fantastic, of course).

Trendy Tunic

Hip Hop Tank

Hip Hop Tank

Tuxedo Dress

Matching Hip Hops :)

Cartwheel Collection

Cartwheel Collection - dress option

Samson Sweater

This is my adorable nephew, E, in his Samson Jacket. Isn't he delicious??!
All of the LN patterns are well-written, clearly organized, and have photos for every step. Tami's formatting utilizes some of the newest features in Adobe, like layers (so you can print only the size you need!) and embedded links so you can click actual tabs in the pattern and move to various parts of the tutorial without having to skim through all of the pages. And she's always available by email or the LN Facebook page, which is nice if you're ever stuck on a step. (Side note: the first few times I contacted designers with questions I had about their patterns, I didn't get a reply from any of them. I followed up a few days later - still no reply. It was totally disappointing, and I really appreciate designers who go out of their way to make themselves available to those of us who buy and sew their patterns.)

Anyway, back to the post at hand. When I was cutting out the fabric for my tester Mallory dress (so cute, by the way - Miss P has requested a different one for each day of the school week!), I noticed that the back bodice pattern piece and the skirt pattern piece looked an awful lot like a skater dress. What is a skater dress? Skater dresses get their name because they look like, well, ice skater dresses. A fitted bodice and a twirly circle (or half-circle) skirt are the basic hallmarks - they can be with or without sleeves, and sewn from a variety of fabrics.


Since the Mallory Dress pattern includes short, 3/4, and long sleeves (and two skirt lengths), this was an easy modification to make. I simply cut two of the back bodice pieces on the fold, and lowered the neckline of one of them to become the front bodice.

Bodice pattern pieces for the Mallory Skater Hack
You'll also need to cut out two skirt pieces (front and back) and two sleeves, and then you'll be ready to sew up your Skater Mallory.

I sewed the shoulder seams together and measured the front neckline, and cut a neckband that was approximately 80% of the length of the neckline. You might need to cut a neckband that is slightly shorter or longer depending on the stretch of your fabric.

I like to attach neckbands in the round, but if you're unsure of the length you need, an easy way to work around this is to sew only one shoulder seam shut first. Then, fold your neckband piece in half wrong sides together, and press. With raw edges lined up, sew (with a stretch stitch) or serge the neckband to the neck opening of the bodice - make sure to stretch the neckband a bit as you sew, but not the bodice fabric. Give it a good press with lots of steam to help it get back into shape. Last, you'll trim off any remaining neckband fabric and sew the second shoulder seam, taking care to line up the edges of the neckband (you might want to baste it in place before sewing or serging just to make sure).

Skater Mallory - interlock with rib knit neckband

Proceed with the pattern instructions from here, adding sleeves and the skirt. Hem everything and you're all done. Congratulate yourself for unlocking the bonus pattern that Tami included with the Mallory dress - two totally different looks from the same basic pattern pieces!

Original Mallory

Skater Mallory

  Make sure to join the Love Notions sewing group on Facebook to show off your designs, too - we'd all love to see what you've been working on! And you can find me at Handcrafted by RED on Facebook or follow me on Bloglovin - I've got lots of exciting things in the works. :)