Tuesday, April 28, 2015

Blog Tour Time: Little Kiwi's Closet Bow Back Beauty Blog Hop!


It's finally springtime here in the northeastern US, and I've got my mind on summer. We're starting to make vacation plans, got our membership email from the town pool, and I'm coming to terms with the fact that school will be done in less than two short months. Miss P has grown so much in the past few months that last summer's clothes are borderline indecent, and it's time to start filling her closet with all things new. Her summer style is super casual - I like to give her a pile of separates to choose from, and she can mix and match to her heart's content. She's still a dresses-and-tunics girl, and swaps her winter leggings for cartwheel shorts. No big changes here, wardrobe-wise.


When Lydia released the Bow Back Beauty pattern, I knew immediately that Miss P would love it. In fact, I'd already bought it and printed out the pattern before I had the opportunity to join this blog tour. There is a huge size range (from newborn - 12 years) and sooooo many options - attached circle skirt, peplum, double peplum, maxi skirt, high low skirt, multiple sleeve lengths, and even a onesie option for the smallest sizes. I can't wait to make a coordinating onesie version for my niece who is due to arrive in just a few weeks!


I opted to make a sleeveless peplum for P, since she's always a fan of things that twirl. And with a full circle skirt, this one's got plenty of twirl even at the peplum length! There's a plain back option, but there was no way I was skipping out on this fun bow option. Lydia's instructions are clear and well-photographed, and despite the plethora of options it is really easy to follow along with the pattern and find the instructions for your chosen options. There are separate cutting lines on the pattern pieces to place the peplum at the natural waist or at the high hip, and I chose the natural waist here. The way the pattern pieces are nested makes it easy to blend between sizes, too - I made a size 4 for my girl based on her chest and waist measurements but graded the length to the size 5 based on her height.


This kiddo has many amazing personality traits, but her attitude in the mornings is not always one of them. ;) It's a huge testament to this pattern that she willingly posed for photos before school. Before breakfast, even. Seriously, folks, we have a winner here.

You can pick up a copy of the pattern here and here, and make sure to enter the giveaway below (no purchase necessary).

a Rafflecopter giveaway

And don't forget to check out the other stops on the hop, too!


Monday, March 30, 2015

Blog Tour Time! The Verona Dress by Jennuine Design


I'm so excited to be joining Jenn from A Jennuine Life/Jennuine Design to kick off the blog tour for her latest pattern, the Verona Dress! Miss P and I had the chance to test this pattern, and it was a huge hit with both of us. 


To be honest, I've been sewing tons and tons of knits lately, and my wovens stash has been pretty neglected. Miss P wears tunics or dresses and leggings to school most days, so that's what I've been sewing for her. We're a pretty casual family (to P's disappointment ;) ) so my fancy girl doesn't have lots of opportunities for nice-dress wearing. For this dress, we will totally make an exception. 


The Verona Dress has lots of great features that make it a fun sew and really wearable - Jenn drafted and tested the dress from newborn to size 12, and in the non-baby sizes there are no closures at all. The dress has a neat notched collar, a notch in the back of the neckline, and elastic in the back at the waistline to make it easy to pull on and off. The bodice is fully lined, and Jenn even made a great video tutorial to further illustrate how to sew up a lined sleeveless bodice like this one. I'm completely challenged when it comes to spatial relations, and despite clear and well-illustrated instructions in the written tutorial, it took the video to really make it easy for me to complete the bodice. Actually, once I viewed the video, I went back to my sewing machine and finished the bodice on the first try - and then shrieked a little about how cool it was that it came together like that!


The skirt is also lined, and the underskirt is cut a little longer so it peeks out from the bottom. The way Jenn wrote the pattern encloses the elastic and leaves the skirt nice and full at the waistline - the extra volume is perfect for twirling!


When we tested this dress, Miss P was still sporting two casts from her tendon surgery, but that didn't stop her from dancing and twirling for our photoshoot. I'm sure she'll be wearing this for Passover with our family, and throughout the upcoming summer, too. Jenn includes detailed size charts, and because the skirts are cut separately from the bodice, it's easy to mix and match sizes or add length to either portion if you need to. I cut a size 4 based on my girl's chest and waist measurements, but lengthened the skirt based on her height. 

I'm glad we went the classic route with this watercolor fabric - the Verona dress has a great vintage vibe and is an awesome mix of classic styling with modern details. Jenn included lots of other options, too, including several sleeve lengths, an adorable notched pocket, and instructions for adding tulle to the underskirt. Miss P has already asked me to add those pockets to the next Verona dress I sew for her!


You can find the Verona dress in Jenn's shop here (and it's still on sale through Saturday!), and make sure to check out the rest of the tester tour this week and next! 


Wednesday, March 25, 2015

Flip this Pattern! Part 2 - the Snappy Playdress

For Miss P, I wanted to make a dress using some of the styling from the Boardwalk but with a more streamlined silhouette. 

It's a Boardwalk/Gloria mashup!
For this Boardwalk flip, I was inspired by this dress from a recent Hanna Andersson catalog:

dress by Hanna Andersson
To achieve a similar look, I used the Gloria playdress, also from Peekaboo Patterns, and mashed it with the placket and henley neckline from the Boardwalk. I used the Gloria because it is a more fitted silhouette than the Boardwalk, and I wanted that fit for my dress. I extended the placket to the full length of the bodice (which is longer with the Gloria dress than with the Boardwalk, where it is more of a contrast yoke style) and added interfacing again to support the snaps. I mashed the necklines a bit as well, so I could use the henley neckband from the Boardwalk. I added the gathered skirt from the Gloria dress, and my look was complete!


I'll be entering both of these flips in the linky party over at Frances Suzanne - make sure to check out what the competitors have come up with this month, too!

Flip this Pattern! Peekaboo Patterns Boardwalk Henley and Hoodie

Well, it's no secret that I'm a huge fan of Peekaboo Patterns, and the Boardwalk Hoodie and Henley is one of my all-time faves. I love patterns that are unisex (this actually has a tee and a dress version along with both neckline options) and the hood is the perfect size to mash with other patterns (like the Grand Slam tee). When I saw that Frances Suzanne's Flip this Pattern was going to be taking on the Boardwalk, I knew I had to join in.
Nephew cuteness overload!
For my first flip, I made a fleece jacket for my cutie pie nephew, E. I had made a similar one last year when he was tiny, and my sister said it was great for keeping him warm in the carseat and for quick trips around town. Because the Boardwalk pattern has a nice amount of ease, it lends itself well to becoming a jacket - plenty of room in the arms and just enough room for a light layer underneath without having to upsize. 


To make it a jacket, I joined the pattern pieces for the top and bottom bodices so I had a single front pattern piece (instead of a separate top and bottom as in the original colorblocked version) and one for the back. I extended the placket from the top of the front bodice piece all the way down to the bottom, and widened it just a tad. I cut two mirror images for the front so I had a left and a right, and cut the back on the fold as in the pattern. The ears were self-drafted and sewn into the outer hood layer before joining the hood to the lining. I put a strip of interfacing into each side of the placket to support the snaps, and used KAM snaps for a pop of color. And that was it! A few small changes to bring about a whole new look for the Boardwalk. :)

Read on for how I flipped the Boardwalk for Miss P, too!

Wednesday, February 18, 2015

One Thimble Pattern Review - Blossom Skirt


I was excited to have another chance to participate in the blog tour for the latest issue of One Thimble, the sewing e-zine. Things have been a little crazy around here lately so I opted just to review one pattern this time, but I'll be purchasing the rest of the issue for sure - the patterns are fantastic and the articles are awesome, too. There are great sewing tips and tricks, information related to building a sewing or crafting business, and always at least a couple of tutorial-style articles about various sewing techniques.

I chose the Blossom Skirt by Eliana & Thea for this tour; Miss P wears a lot of dresses but I've made very few skirts for her recently and have been on the lookout for cute new skirt patterns. This one really fit the bill!


The pattern is designed for woven fabrics (I used quilting cottons from a local quilt shop for mine), and includes sizes 12 months - 10 years. There are directions and pattern pieces for including a lining, although I opted to leave mine unlined. Miss P still wears bike shorts or leggings under most skirts, so I didn't think the lining was necessary. 


The tutorial is well-written and thorough, and accompanied by clear photographs. There are a number of adorable details included, though Miss P's hands-down favorite was the pockets. They're generously sized and have a cute pleat detail at the top. The skirt front is gathered between the pockets and has a flat front waistband. The back of the skirt is gathered by elastic in the back waistband. There are two methods for finishing the elastic and the back waistband included in the pattern, and I used the casing so I can go back and adjust the elastic if I need to when (if??!) summer finally arrives here in the Northeastern US. 


I made the size 5 with no adjustments other than to cinch the elastic a little shorter than the pattern called for, and the fit was great. The skirt falls a little above the knee, but I expected that based on P's height. I like that in a darker colored or slightly heavier fabric, like corduroy, this pattern would be great for our cooler fall weather as well. I haven't tried it myself, but I think a stable knit like interlock would likely work also, and would be quite cute with all of the details included. 


The pattern also includes the sweet bow pictured above, and includes templates for three different sizes. This is the medium size, and instead of placing it on the front waistband as shown in the pattern, Miss P decided she'd like it on a headband. I LOVE the finished look. It is a great size and though the construction was different than I've seen before, the completed bow is lovely. I did end up omitting some of the interfacing in my bow, as it was a bit too stiff for my liking. 

I'll definitely be making more of both the skirt and the bows (in all of the sizes) - it feels like a little bonus pattern was included with the skirt. :) This was my first time sewing a pattern from Eliana and Thea, and it was a great experience. The clarity of the steps in the tutorial really helped ensure a nicely finished skirt that was full of adorable details. 


Thanks for stopping by, and please make sure to check out all of the other stops on this tour - you can find us all here:

Disclaimer: I was given this pattern at no charge for the purpose of the review. All opinions are 100% my own, however.

Saturday, February 14, 2015

Boys Can Wear Pink!


When my friend (and co-contributor over at Peekaboo Patterns) Kelly from Handmade Boy told me she was hosting this blog series, I couldn't wait to join in the fun. I love sewing for my boy, and I love anything that helps break down gender stereotypes. (In my pre-sewing life, I was a women's studies major in college. I love this stuff.)

Then I remembered that my boy really dislikes pink. When he learned his colors, he removed all of the pink crayons from the box and gave them to his sister. Seriously. He has plenty of exposure to stereotypically girly things, since he lives with a very stereotypically girly big sister. This kid has spent plenty of time playing dress-up, wearing fairy wings, and joining tea parties. (I have yet to correct him that the lavender straw bonnet that he calls a "cowboy hat" is anything but. It's just too adorable.) And he enjoys all of those things...but he likes his cars and trucks and blues and greens a bit more. He plays with the toy strollers - but flips them over to spin the wheels. You get the idea. I even confess to having said "He's such a BOY!" on more than one occasion.
He's never been much for a lovie or a security blanket, but has had a few different ones over the past two years. One of the first was Winnie the Pooh, but Winnie seems to have been cast aside in favor of a purple Care Bear (he and his sister, without a hint of irony, exchanged Share Bear and Harmony Bear as Chanukah gifts this year) and now lately, Skye from Paw Patrol. Out of all 6 pups (well, 7 now that they've added one) he picked the girl pup as his fave.
You can see here how much love the little figurine has gotten - my poor guy even has a scar on his eyebrow from where he fell on top of her one day and got quite the gash, but he still loves this little pup. "Tiny Skye" was a little uncomfortable for snuggling with, so I bought him the stuffed toy. He calls her "Big Cuddly Skye" and loooooovvvvves her. And heaven help his sister if she thinks she's going to get her paws on this one.
When I first got this Paw Patrol fabric, I made a simple raglan tee for him with charcoal grey sleeves. He loves it and prefers to wear it for 24-hour stretches at a minimum. He even loves it so much  that he'll use a napkin at mealtimes instead of his sleeve. I knew it was time to make a second one for the rotation (I'm not THAT good at keeping up with the laundry...), and this was the perfect opportunity. I used the Moto Maxx pattern from Love Notions, which is one of my all-time favorites for A, and made a size 3 so he'll have a little room to grow. I printed out Skye's badge thanks to Google Images, and then traced and sketched the various components onto Heat n Bond Lite. Ironed that onto grey and pink knit, cut out the pieces and ironed them to my shirt, and then laboriously topstitched each layer one at a time. (If you have an embroidery machine, that would be a much faster way to do this!) When I do appliques, I find it easiest to make sure to do all of my topstitching before I sew up the side seams of the shirt. (It might seem obvious, but if you're like me, it isn't always!)
All that is to say, he may not like pink very much, but you'd never know it sometimes. We'll just say he has an affinity for strong female role models. ;)

Please make sure to check out all of the amazing stops on this tour, and especially Kelly's blog Handmade Boy to see where it all started. She's put together an awesome contest and prize package, too - you can enter using the rafflecopter below.

The prizes include:
Purple Seamstress is offering one yard of solid cotton/lycra fabric and one yard of coordinate
Phat Quarter Shop: $25 gift certificate plus a surprise fat quarter 
Paisley Roots is offering a pattern of choice
Patterns for Pirates is offering a pattern of choice
Mouse House Creations: pattern of choice
Peek-a-Boo Pattern Shop: $20 store credit
If Only They Would Nap: Bottoms Up Pants Pattern
Mabel Madison: 10% off code for visitors and 1 yard of the fabric 'Pit Stop' poplin in pink
Thanks for joining us!

a Rafflecopter giveaway

Wednesday, February 11, 2015

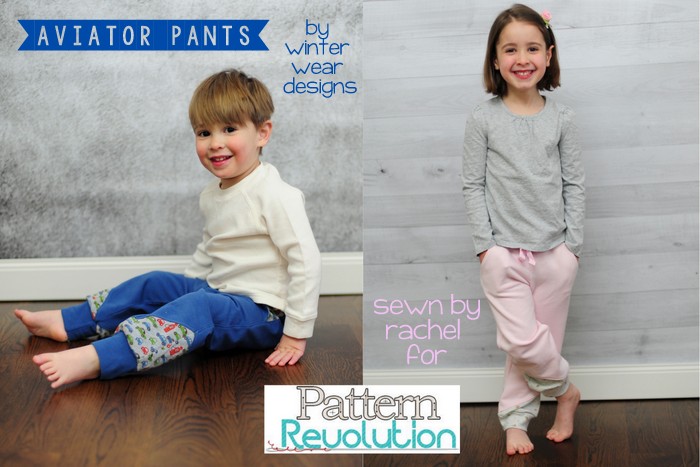
Aviator Pants by Winter Wear Patterns - Pattern Revolution Tryout Review

I've got really exciting news that I am still pinching myself about - I was just selected to be a contributor for Pattern Revolution! I submitted the application last month, and found out right after we'd gone away on vacation that I was one of the finalists who'd gotten a callback. For our callback, we had to pick one of the patterns from Winter Wear Designs, sew it up, and write a sample review. Here's what I submitted:
Google Drive3.jpg
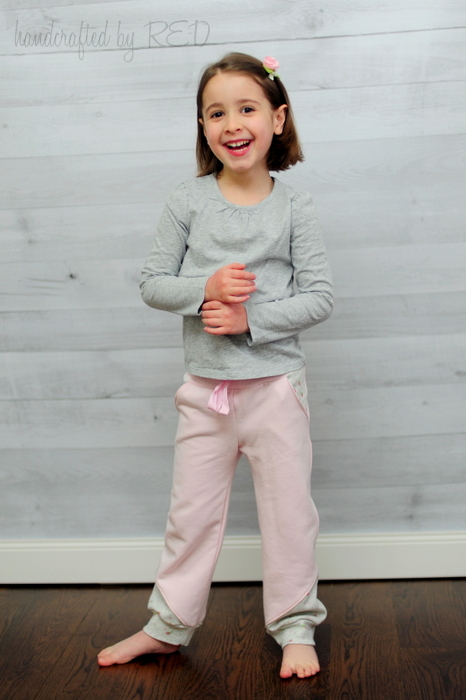
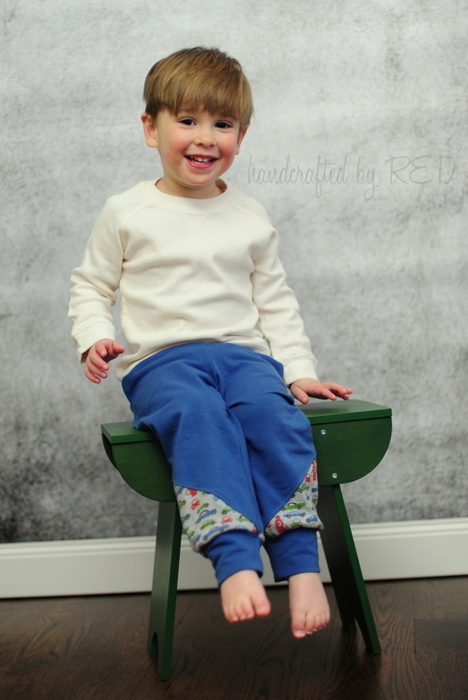
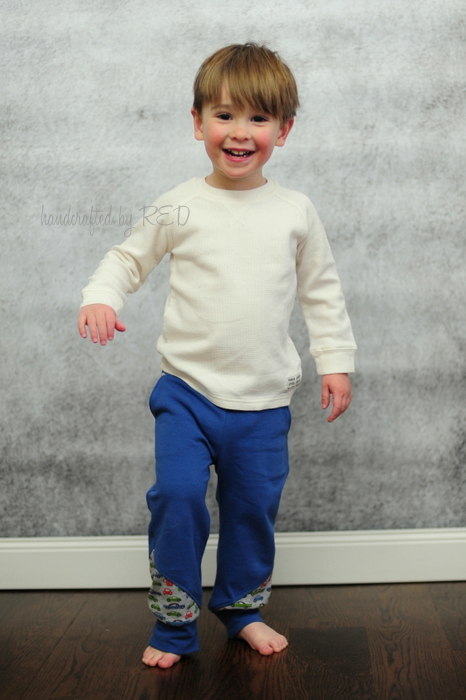
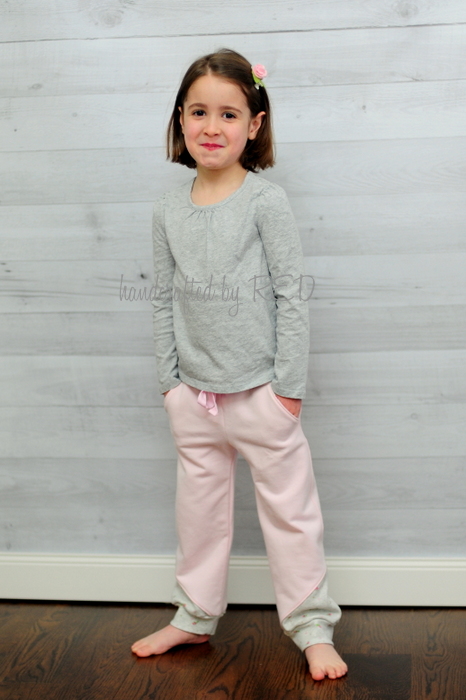
Hi, I’m Rachel from Handcrafted by RED, and I was so excited to have the chance to review the Aviator Pants by Winter Wear Designs! The Aviator Pants are a knit cargo pant with lots of included options and a great size range (18m - 14), and their versatility makes them a great staple for your pattern stash. I sew primarily for my 5 year old daughter and 2.5 year old son, so any pattern that can be used for both of them automatically goes to the top of my “must buy” list. Although this pattern was part of last summer’s Bundle Up sale for boys, it can certainly be used for girls, too. Even my dresses-and-leggings-preferring girly girl really liked the pair I sewed up for her.
DSC_8761-PR2.jpg
There is no shortage of options here, especially when it comes to fun details! The Aviator Pants pattern also includes:
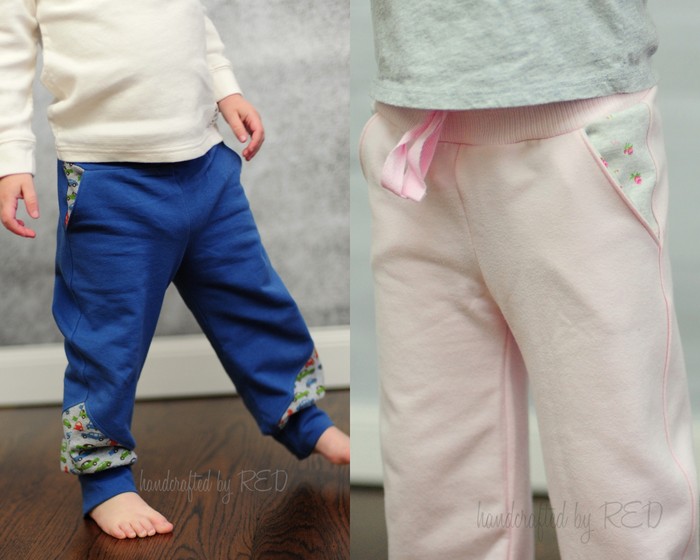
·         Three (yes, 3!) pockets – front slash pockets, back welt pockets, and side cargo pockets
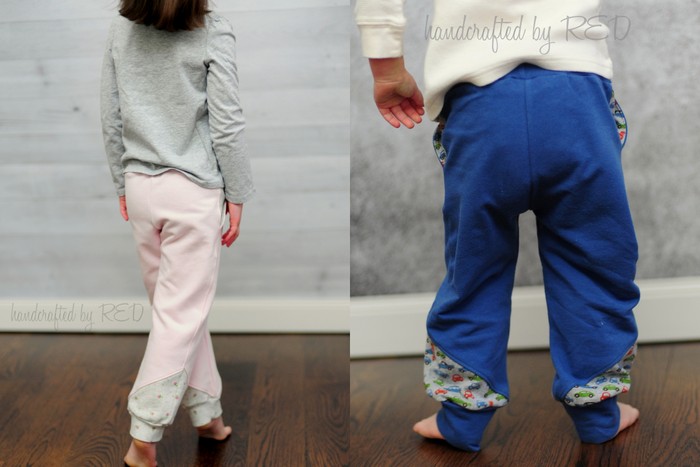
·         Cuffed hems and triangle cutouts on the lower legs – great for showcasing a special or bold print (or using a precious fabric sparingly)
·         Knit yoga-style waistband for optimal comfort (and recommended measurements for elastic lengths should you choose to add it, as I did)
·         A cutting line on the pattern pieces to make shorts
·         Substantial rise that is lower in the front and higher in the back, and provides good rear coverage (even for diapers in the smallest sizes - my little guy was wearing disposables in the size 3 pants that I sewed for him, and the back rise was plenty)
·         Great comfy fit that is roomy without being sloppy
·         Guidelines for selecting a size based on waist, hip, and outseam measurements
·         Printing guide to let you know which of the 16 pattern pages you need to print, based on size and short/pant option desired
·         Pattern layout diagram to aid with pattern assembly
·         Well-written, well-organized tutorial that is easy to follow and understand, with clear photos to accompany tutorial steps (Suzanne, the designer behind Winter Wear Designs, is a professional photographer, so it should be no surprise that the photographs that accompany the tutorial are crisp and clear – they illustrate the tutorial beautifully, and really zoom in on areas that can be tricky.)
02-04-15.jpg
02-05-151.jpg
The dimensions for the rectangular pattern pieces, such as the waistband, pant cuffs, and cargo pockets, are listed as a measurements in the pattern, and I appreciated that Suzanne re-printed those cutting charts on the actual pattern pieces. The Aviator Pants sew up easily and fairly quickly; I spent a bit of time on the topstitching and basting the join for the triangles to help it line up on the sides. Nobody naps here anymore (well, except for my husband ;) ) so I rarely get to finish a garment in one, uninterrupted sew – I’d say each of these took between 1-2 hours from start to finish, though.
DSC_8854-3.jpg
With all of the options, they’re a great intermediate pattern and a great way to try out some new techniques. If you’re more of a beginner, leave off the pockets and the contrast triangles, and just sew up a basic pair with the cuffs and the waistband. They’ll be super cute, and still perfect for play!
DSC_8822-3.jpg
One thing I would have liked to see in this pattern was a lengthen/shorten line on the pattern pieces to aid with blending sizes or adding a little length to make pants without cuffs. My kids seem to be perpetually between sizes so I’m always doing a little adjusting here or there to help things fit well. My little guy measured between a 2 and a 3 here, so I decided to make the 3s for him. He has a little room to grow, as I expected, but the fit was good overall. My daughter’s measurements put her in the size 4, but she needed some extra length to accommodate her height. I added length just above the triangle cutouts, and it worked well for her.
DSC_8745-PR.jpg
I like to let my kids select some of the options when I’m sewing for them, and they both opted for the triangle cutouts and slash pockets. Neither of them wanted cargo pockets or welt pockets this time (my son said, “No squares or rectangles, only triangles!"), which was a bit of a bummer for me. The instructions included for both are really well-written, and can easily be translated to other projects (if you’d like to add welt pockets to a jacket pattern, for example). Suzanne even includes a link to a video tutorial for welt pockets for those of us who learn well with a bit of audio visual instruction.


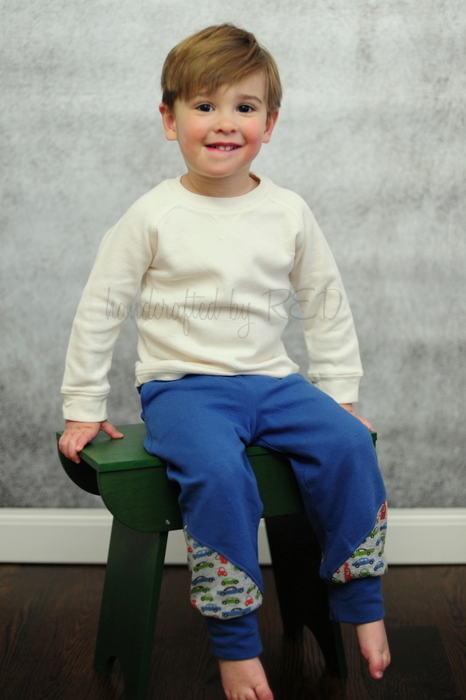
Mr. Triangles-Only picked his all-time favorite car fabric as the contrast print, and I paired it with a blue stretch French terry. We both loved the finished pants – they’re soft and comfy, fit well, and have cars on them. What else could he need? Oh, and the slash pockets were the perfect size for his little hands, too.
DSC_8838-3.jpg
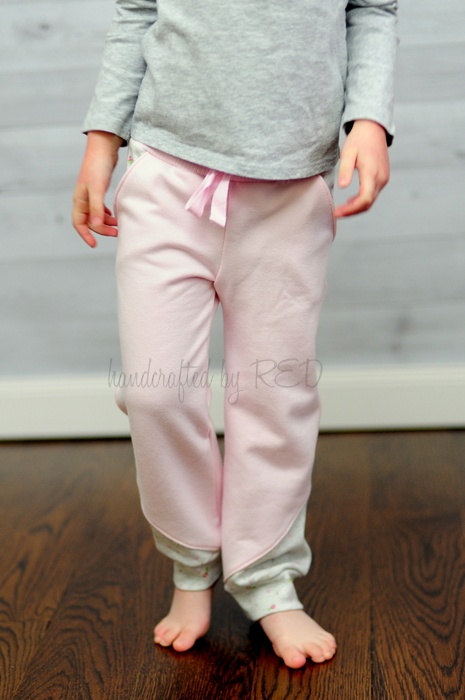
I adore patterns that lend themselves well to upcycling, and the Aviator Pants fit the bill there, too. Miss P’s pants were actually made from a pair of Old Navy lounge pants that haven’t seen their way out of my dresser in years. Since the pattern pieces are cut separately for each leg (and joined at the side seam) it’s easy to repurpose existing pant legs, especially for the smaller sizes. I also re-used the waistband and drawstring from the lounge pants by just cutting the waistband to the measurements specified in the pattern and creating a new back seam before attaching it to the pants.


I used a sweet floral interlock for the contrast, and used it for the cuffs, too. Miss P really loved the pants and left them on after we took pics – she was headed to ballet class and they were perfect for layering over her leotard. Her only complaint? Apparently I tied the waistband too tight. ;)
DSC_8773-PR.jpg
This was the first (and second) time I’ve sewn the Aviator Pants, but it won’t be my last for sure. They’d be super cute with a tuxedo stripe down the side seam for my little guy, or with ruffle fabric in the triangle cutouts for my girl. With so many possibilities, the hardest part will be picking the fabrics! :)