Monday, August 18, 2014

"Hidden" Pattern alert - Love Notions Mallory Dress includes a bonus pattern, too! (tutorial inside)


It's no secret that I'm a huge fan of Tami Meyer's Love Notions Sewing Patterns. Tami is an amazing sewer, and has had a successful business for many years selling custom designed children's clothing. Recently she began grading her patterns and releasing them for sale to home sewers (seamstresses? sewists? I'm still tripped up on that one...) like me. After sewing the Everyday Playdress, I sent Tami a message and basically begged her to let me test for her. ;) I might have even included a few photos like this one, of P in one of her Everyday Playdresses.

(Shameless.)

Tami invited me to join her group of testers, and since then I've tested the Trendy Tunic, the Tuxedo Dress, the Cartwheel Collection, the Hip Hop Tank (and the Ladies Hip Hop Tank - the first sewing I've done for ME that I was actually happy with!), the Mallory dress, and the Samson Sweater - her first pattern for boys that has just been released (and is fantastic, of course).

Trendy Tunic

Hip Hop Tank

Hip Hop Tank

Tuxedo Dress

Matching Hip Hops :)

Cartwheel Collection

Cartwheel Collection - dress option

Samson Sweater

This is my adorable nephew, E, in his Samson Jacket. Isn't he delicious??!
All of the LN patterns are well-written, clearly organized, and have photos for every step. Tami's formatting utilizes some of the newest features in Adobe, like layers (so you can print only the size you need!) and embedded links so you can click actual tabs in the pattern and move to various parts of the tutorial without having to skim through all of the pages. And she's always available by email or the LN Facebook page, which is nice if you're ever stuck on a step. (Side note: the first few times I contacted designers with questions I had about their patterns, I didn't get a reply from any of them. I followed up a few days later - still no reply. It was totally disappointing, and I really appreciate designers who go out of their way to make themselves available to those of us who buy and sew their patterns.)

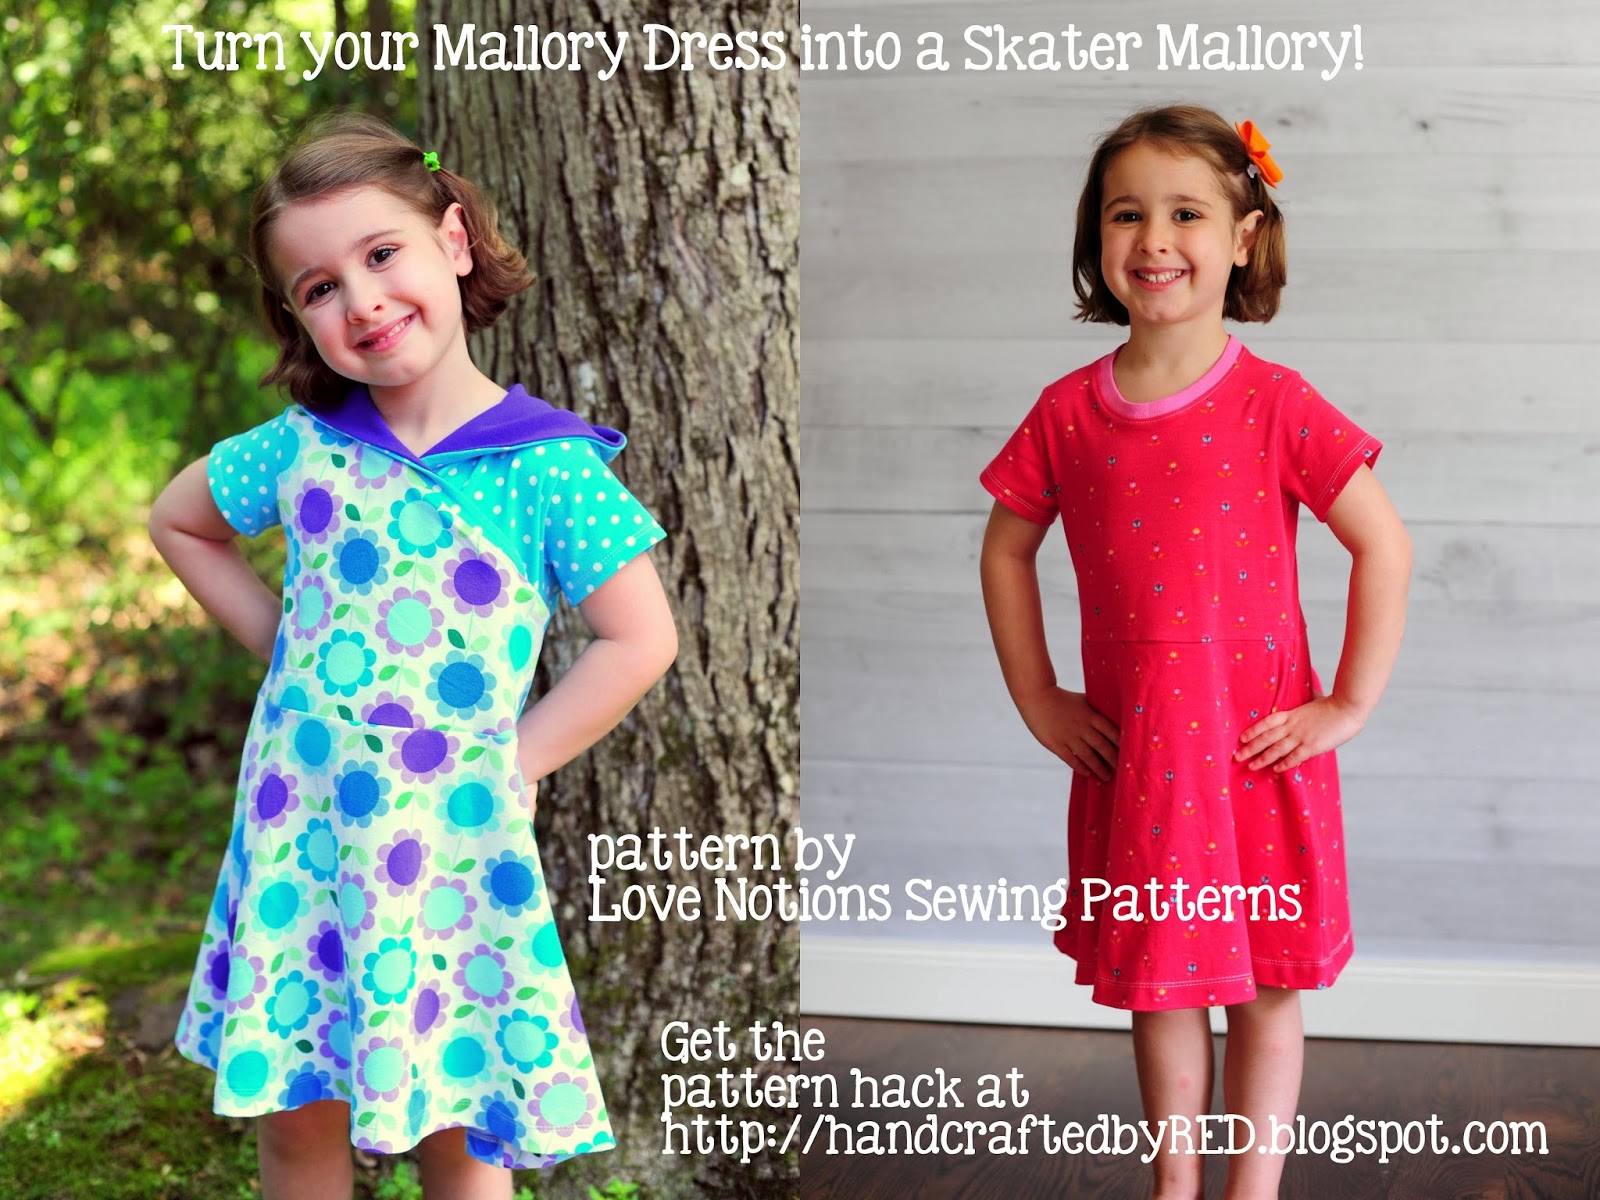
Anyway, back to the post at hand. When I was cutting out the fabric for my tester Mallory dress (so cute, by the way - Miss P has requested a different one for each day of the school week!), I noticed that the back bodice pattern piece and the skirt pattern piece looked an awful lot like a skater dress. What is a skater dress? Skater dresses get their name because they look like, well, ice skater dresses. A fitted bodice and a twirly circle (or half-circle) skirt are the basic hallmarks - they can be with or without sleeves, and sewn from a variety of fabrics.


Since the Mallory Dress pattern includes short, 3/4, and long sleeves (and two skirt lengths), this was an easy modification to make. I simply cut two of the back bodice pieces on the fold, and lowered the neckline of one of them to become the front bodice.

Bodice pattern pieces for the Mallory Skater Hack
You'll also need to cut out two skirt pieces (front and back) and two sleeves, and then you'll be ready to sew up your Skater Mallory.

I sewed the shoulder seams together and measured the front neckline, and cut a neckband that was approximately 80% of the length of the neckline. You might need to cut a neckband that is slightly shorter or longer depending on the stretch of your fabric.

I like to attach neckbands in the round, but if you're unsure of the length you need, an easy way to work around this is to sew only one shoulder seam shut first. Then, fold your neckband piece in half wrong sides together, and press. With raw edges lined up, sew (with a stretch stitch) or serge the neckband to the neck opening of the bodice - make sure to stretch the neckband a bit as you sew, but not the bodice fabric. Give it a good press with lots of steam to help it get back into shape. Last, you'll trim off any remaining neckband fabric and sew the second shoulder seam, taking care to line up the edges of the neckband (you might want to baste it in place before sewing or serging just to make sure).

Skater Mallory - interlock with rib knit neckband

Proceed with the pattern instructions from here, adding sleeves and the skirt. Hem everything and you're all done. Congratulate yourself for unlocking the bonus pattern that Tami included with the Mallory dress - two totally different looks from the same basic pattern pieces!

Original Mallory

Skater Mallory

  Make sure to join the Love Notions sewing group on Facebook to show off your designs, too - we'd all love to see what you've been working on! And you can find me at Handcrafted by RED on Facebook or follow me on Bloglovin - I've got lots of exciting things in the works. :)

Sunday, August 17, 2014

Easy, inexpensive DIY photo backdrop!

Miss P has been complaining lately that our standard backdrops are "boooooorrrrring, Mom." (Say it with an eye roll and a big preschooler sigh, and it will be a more accurate impression.) To be fair, we've been taking tons of photos lately, and I do tend to stick to our more neutral backdrops most of the time. We've been venturing outdoors for more photoshoots, but for a quick and easy set of photos I prefer to stay indoors. 

I've been eyeing a few new backdrops, but of course they're all more variations of neutral. ;) So when I was at Joann's this past week, the faux fur caught my eye. It was on sale, and is a nice wide width (60"), so I picked up 2 yards of the pink (and wow is it pink). For less than $20 I had a nice new 60" x 72" backdrop to surprise my little diva. (She was suitably impressed, thank goodness. Little brother couldn't stop petting it. With his face.)

"It's so....pink! And furry!"
It's definitely not neutral, and I doubt it will enter our regular rotation, but it's exactly what Miss P was looking for. Gotta keep our models happy sometimes, ya know?


P's top is a Rio Racerback from Peekaboo Patterns. Everything else is (gasp!) storebought.
For more updates and links to other fun and easy projects, make sure to stop by and like Handcrafted by RED on Facebook, and follow along on Bloglovin.

Thanks for stopping by!

Tuesday, August 12, 2014

sewVery Sunny Dress and Top Pattern Tour!

I'm sewVery excited for my first pattern tour today! Sorry, couldn't help it. My dad reads my blog and I know he'll appreciate that one. ;)

I was lucky to be selected as one of Veronica's testers last month for her very first fully graded pattern release - the sewVery Sunny Dress and Top! Besides the options to make a dress or top, you can add an adorable ruffle to the neckline (View A) or leave it plain (View B), and the straps are long enough to cross in back or leave straight and thread them though the loops to tie. 

Veronica may be new to pattern drafting, but one look at this pattern and you'll know she's got a wealth of sewing experience to share. Her pattern is beautifully organized and well written - her instructions are clear and her photos are perfection. I LOVED all of the annotated photographs - it was so helpful to me that she labeled whether the photo showed the right or wrong side of the fabric, and zoomed in on tricky spots to make me less likely to reach for my seam ripper. 

For the test I sewed up a View A dress in seersucker with a contrasting seersucker ruffle - perfectly sweet and summery. 

Little Miss Giggles
This is the size 4T, no changes or modifications made. It was the tester version, so I'm sure there have been some small tweaks since then, but even Veronica's tester version was pretty ready for release! I was so impressed by all of the professional finishes that she added - the way the ruffle is attached to the neckline looks fantastic, and the partial lining in the front is a great touch.

On the back, there is an elastic casing (also beautifully finished on the inside of the dress) and the ties can be threaded through the loops straight or crossed over - both looked great but Miss P preferred the crossed over straps so we went with that for photos. 


The straps are a nice length and it was no problem to tie them into a nice sized bow. It seems this summer that Miss P has been wearing (and so I've been sewing) mostly knits, and this dress was a nice trip back into my stash of wovens. This seersucker (from Chez Ami) is super soft and is so easy to work with, and it was a treat not to have to worry about ends curling or stretching when they weren't supposed to. :)

Of course, now that I've said that, I'll show you the second version of the sewVery Sunny pattern that I sewed up for the blog tour. Since I can't leave well enough alone, I figured I'd give the pattern a try with a knit. Veronica recommends light to mid-weight wovens in the pattern, but given the fit of the bodice and the construction of the dress, I thought I could probably make it work. And if I couldn't, I just wouldn't show you. ;)

Success!
But it worked - and I love it! I used a medium weight cotton lycra that I had a half yard cut left, and it was plenty. I even used the full width of the fabric to make the straps nice and long for this one (I cut that strip in half, though, so each strap ended up about 30" long).


This pattern has just enough of an a-line to have a great drape and still hold its shape well, and a knit that is even more stable (like an interlock) should work great, too. I actually didn't need to adapt anything else along the way - since I used view B (without a ruffle) the bodice and the lining were sewn together around all edges, enclosing the straps, and the only thing that needed to be hemmed was the bottom of the top. The only other modification I made was instead of making two small loops that would be sewn to the back of the dress for the straps to pass through, I just made one slightly larger loop and centered it (oriented vertically) right above the casing. 

We're rapidly approaching fall here in the Northeast so I'll probably be packing this pattern away soon, but I'll definitely be reaching for it again in the spring - we've got quite a few sizes to go before P outgrows it, and we both loved the classic look of the sewVery Sunny. 

Make sure to check out the rest of the tour - Veronica's got an awesome lineup of bloggers (still can't believe I made the cut!) and there will be a giveaway at the end of the tour, too. She's offering two copies of the pattern to the winners!


Please come like Handcrafted by RED over on Facebook - I've got lots of fun stuff in the works! I've done over a dozen pattern tests in the past month, and have my first tutorials and another blog tour coming up, too. Hope to see you there!


Monday, July 28, 2014

Welcome Peek-a-Boo Pattern Shop Fans!

I'm so excited to have been selected as a contributor for the blog at Peek-a-Boo Pattern Shop! I'll be posting one tutorial monthly for the next year, and am hard at work on my first one already. Amy was the first designer I tested a pattern for, and even before that some of the first pdf patterns I purchased were hers - I'm excited to be a part of her team! 

A in one of his many, many Grand Slam Tees

Outtakes from our photoshoots for the Cabana Swim Bottoms pattern test

Sunday, July 27, 2014

Kids Clothes Week, Days 3-7

Well, I got off to a good start, and then this happened:

"Mommy!! A crane! At our house!"
Isn't that always how it is? We replaced part of our air conditioning unit and our.entire.roof this week. It was a crazy (and expensive) week, and I'm beat. We did get to do some fun summer stuff like this:
Hang Ten Rash Guard from Peekaboo Patterns/Swashbuckler Swim Trunks from Patterns for Pirates

Hang Ten Rash Guard from Peekaboo Patterns/Cabana Swim Bottoms from Peekaboo Patterns
I did get some good work time this weekend, though, and went from having a stack of unfinished projects to having a stack of nearly-finished projects.

Exhibit A: (some of) The Nearly-Finished Projects
 Five pairs of shorts and three tees for A, three dresses for P, a couple of gifts, and a few new testing projects. If this were called Kids Almost-Finished-Clothes Week, I'd be golden. ;) Stay tuned for the finished products...

Tuesday, July 22, 2014

Kids Clothes Week, Day 2

Another pattern test was at the top of the list today, and I got started super early - as in, way too late last night. ;) Couldn't help it, this was calling my name and I couldn't wait to see how it turned out. Will share photos soon, but for now, another sneak peek:
(Also) Coming soon...

The pattern from yesterday's sneak peek has been released, so I can share a few more photos now. This was my first time testing for Terra's Treasures, and it was a ton of fun. I made three versions of the Town Square dress and top during testing, as Terra worked really hard to get the fun pieced neckline just right. This pattern was like a puzzle and I loved watching all of the pieces come together. The hardest part was picking fabrics! The first version (on the left) is upcycled from an Old Navy raglan tee, and I used the sleeves from that top as the side pieces for the bodice of version 2 (the Jasmine top). Found that tee at a Disney outlet when we were on vacation a couple of months ago and it was fun to make something non-Frozen for a change. ;) Of course, when I started to pick fabrics for the third version, Miss P begged me to use a Frozen tee for that one. Such is life with a 4.5 year old, or so I've been told. 

Town Square dress and top, tester versions 1-3
The Town Square dress and top pdf pattern can be found on Etsy here.

Monday, July 21, 2014

Kids Clothes Week, Day 1

When I told him this was Kids Clothes Week, my husband laughed and said every week is Kids Clothes Week around here! I suppose he has a point, since most of my sewing is for the kids and I do try to spend time sewing nearly every day. It's for my sanity! ;) Still, I'm planning to sew along and keep up with the things on my to-do list. Most of what I've got going on this week involves pattern tests, the Peek-a-Boo clothing swap, a few UFOs (unfinished objects), and my first tutorial (eek!).

As for day 1, I can't say too much since I've been working on a handful of pattern tests this week and they're still top secret. But I can share a teeny, tiny sneak peek...see, even Miss P is being mysterious!

Coming soon...